Article
Chatbot with Spring AI
Implement a chatbot with Spring AI that supports conversations and function calling.


Table of contents
- Introduction
- Spring AI configuration
- Define a persona
- Support conversations
- Implement the UI
- View and delete the conversations
- Add function calling
- How function calling works
- Conclusion
Introduction
In this second Spring AI article, I will focus on implementing a simple chatbot. The chatbot will support conversations with users and will also be able to use methods from our business services.
A sample application illustrating this article is available in GitHub,
see spring-ai-chatbot folder of spring-ai-samples.
The articles in this series:
- Getting started with Spring AI: Ollama and OpenRouter setup, prompting, templates, temperature, structured output, token usage, etc.
- Chatbot with Spring AI (this article): chatbot, conversations, function calling.
Please refer to the first article to properly get started.
Spring AI configuration
In the previous article, I showed how we can use Ollama
or OpenRouter as LLM providers with Spring AI.
The former runs local LLMs while the latter is an online LLM service provider.
This article will follow the same approach, so please refer to the previous article for the configuration basics
in the pom.xml (Spring AI BOM and starter) and application.properties (Spring AI configuration properties).
The sample application from the previous article was command line based. For this chatbot, we will
write a web application. The backend will expose an HTTP chat endpoint called from a basic chat UI implemented as
a simple HTML page. So we also add Spring web support in pom.xml:
<dependency>
    <groupId>org.springframework.ai</groupId>
    <artifactId>spring-ai-starter-web</artifactId>
</dependency>
Define a persona
The main abstraction to interact with the AI model is still the ChatClient interface.
We build an instance in a @Configuration class.
In the next sections, we will improve the ChatClient construction to support additional features.
For now, we simply define the chatbot persona with a system prompt:
@Configuration
public class AiConfig {

    @Bean
    public ChatClient chatClient(ChatClient.Builder builder) {
        return builder
            .defaultSystem("You are a polite, friendly and helpful assistant.")
            .defaultAdvisors(
                new SimpleLoggerAdvisor())
            .build();
    }
}
This example is very basic. In a real application, you would probably want to provide a richer prompt with dos and don'ts, as well as some context about your application.
Note that we can also register a SimpleLoggerAdvisor to log the various messages exchanged with the AI model.
This requires some logging configuration, see the previous article.
Support conversations
A chatbot is not very useful if it cannot remember the various messages of a conversation (human provided or AI generated). With Spring AI, we have to explicitly enable it. Supporting conversations is a two steps process. First we enable chat memory support, then we identify the conversations.
The memory support is enabled when building the ChatClient:
@Bean
public ChatClient chatClient(ChatClient.Builder builder, ChatMemory chatMemory) {
    return builder
        .defaultSystem("You are a polite, friendly and helpful assistant.")
        .defaultAdvisors(
            // Enable chat memory support
            MessageChatMemoryAdvisor.builder(chatMemory).build(),
            new SimpleLoggerAdvisor())
        .build();
}
Multiple things happen here under the hood. A ChatMemory bean is automatically created and injected by Spring.
By default, the implementation class is MessageWindowChatMemory. It keeps the last N messages (20 by default).
It delegates the actual messages persistance to a ChatMemoryStore bean, which is by default an in-memory store
of type InMemoryChatMemoryRepository.
A real application should use a persistent store instead, for example a JDBC based one.
From that ChatMemory, we create a MessageChatMemoryAdvisor. It will automatically add the previous messages
of the conversation to the prompt sent to the LLM.
The second step is to identify the conversations.
This is done by dynamically providing a conversation ID when executing a prompt with the ChatClient.
For our chatbot, the code is in the web controller endpoint called by the UI:
@RestController
@RequestMapping("/chat")
public class ChatController {

    @Autowired
    private ChatClient chatClient;

    @GetMapping
    public String getResponse(
            @RequestParam String request,
            @RequestParam(name = "conversation") String conversationId) {
        return chatClient.prompt(request)
             // Dynamically provide the conversation ID
            .advisors(a -> a.param(ChatMemory.CONVERSATION_ID, conversationId))
            .call().content();
    }
}
I chose to use a conversation ID provided by the UI (see next section). In a real application, you should probably use a more private and secure identifier.
Implement the UI
Now that the bases of the backend are set, let's focus on the frontend. It takes the form of a simple HTML page using several libraries:
- Bootstrap for the look and feel.
- Alpine.js is the JavaScript framework used to call the chat endpoint and update the UI. It is simple to use, expressive and does not require compilation. It's some kind of middle ground between jQuery and Angular.
- Marked is used to convert the AI responses in Markdown to HTML.
A snapshot of the UI:
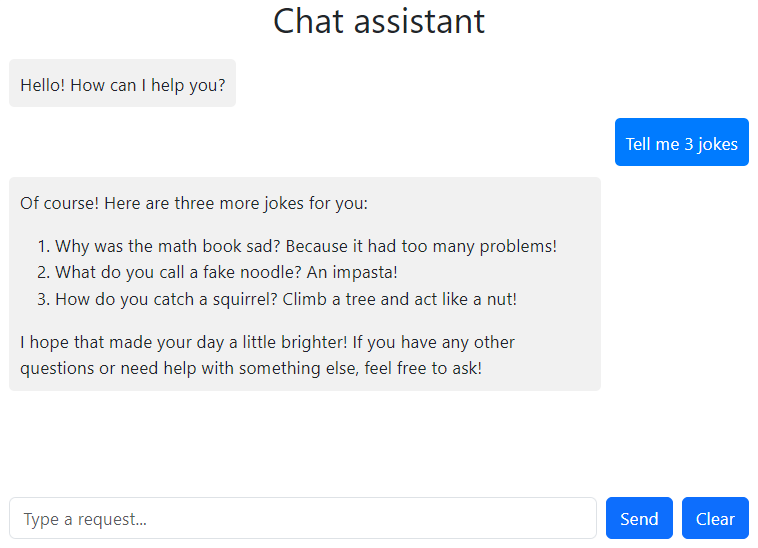
I will not walk you through the HTML and JavaScript code here, please see linked repository.
But a word about the conversation ID generation. When the page is loaded, if no conversation parameter is present
in the query string of the URL, a random one is generated. This allows to have multiple independent conversations
by simply opening multiple browser tabs. This is good enough for demo purposes, but in a real application,
you would probably want to implement a more robust solution.
View and delete the conversations
When the conversations are stored on the server side, as it is the case in this application, it is possible to manage them. Spring AI can list the conversations, view their content and delete them.
Viewing user conversations raises privacy and security concerns, so this feature should be implemented with caution. I'm only showing it here for demonstration purposes.
Being able to delete conversations matters when the conversations are saved in a persistent store such as a database. The deletion could come from a user decision or be automatic after a while, it's up to the application developer.
Here is a sample REST controller implementing these features:
@RestController
@RequestMapping("/conversations")
public class ConversationController {
@Autowired
private ChatMemoryRepository chatMemoryRepository;
@GetMapping()
public List<String> listConversationIds() {
return chatMemoryRepository.findConversationIds();
}
@GetMapping("/{id}")
public List<Message> viewConversation(@PathVariable String id) {
return chatMemoryRepository.findByConversationId(id);
}
@DeleteMapping("/{id}")
public void deleteConversation(@PathVariable String id) {
chatMemoryRepository.deleteByConversationId(id);
}
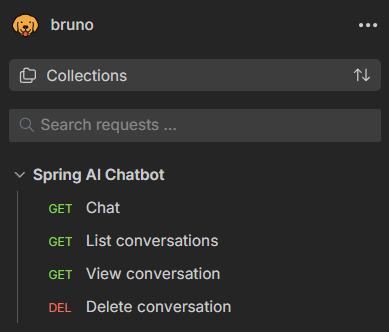
}To easily call the conversation management endpoints of the sample application,
I added a Bruno collection in the repository.
See spring-ai-chatbot/bruno folder of spring-ai-samples:
Add function calling
So far, we implemented a general purpose chatbot. It can answer various questions, but it does not have access to the specific business logic or data of the application. To make it more useful, we can add the ability to call the methods of the business services of the backend. This is named function calling or tool calling. But note that this is not supported by all LLMs, check their documentation first.
With Spring AI, two steps are needed: first document the tools (they are the methods that can be
used by the LLM), then declare in the ChatClient the business services containing these tools.
To document a tool, we add a description (and an optional name) with the @Tool annotation on a
method of the business services and @ToolParam of the method parameters.
These descriptions are used by the LLM to determine which tool to call and how to call it.
Here is an example business service providing weather information:
@Service
public class WeatherService {

    @Tool(description = "Return the current weather report for a given city including the condition and temperature in celsius.")
    public WeatherReport getCurrentWeather(@ToolParam(description = "The name of the city") String city) {
        ...
    }
}
For this method, the output type is a Java record:
public record WeatherReport(WeatherCondition condition, double temperatureInCelsius) {
}
Then we declare the tools during the ChatClient construction:
@Bean
public ChatClient chatClient(ChatClient.Builder builder, ChatMemory chatMemory, WeatherService weatherService) {
    return builder
        .defaultSystem("You are a polite, friendly and helpful assistant.")
        .defaultAdvisors(
            MessageChatMemoryAdvisor.builder(chatMemory).build(),
            new SimpleLoggerAdvisor())
        // Declare the services containing the tools
        .defaultTools(weatherService)
        .build();
}
Of course, we can declare multiple business services with .defaultTools(service1, service2),
each one providing multiple tools.
Now we can use the chatbot to get weather information:
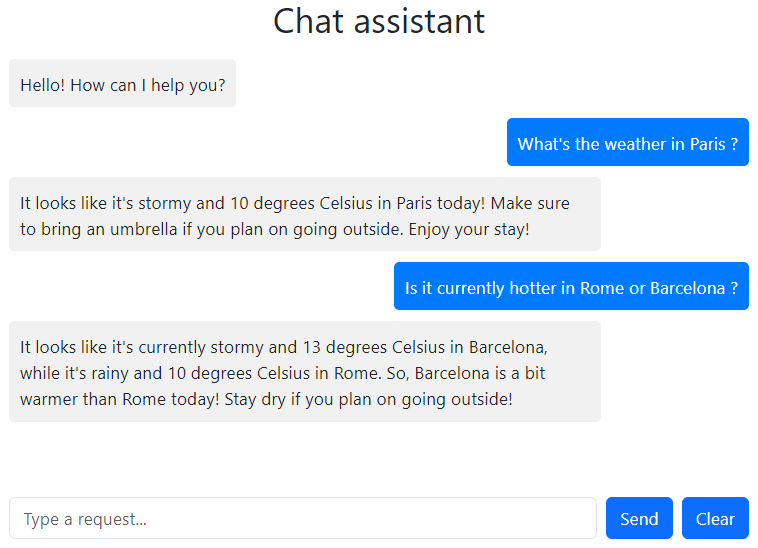
The getCurrentWeather tool is read-only, it does not modify any data. But you can implement tools
that create/update/delete data if needed.
How function calling works
If you are curious about how function calling is implemented under the hood, here is how it goes:
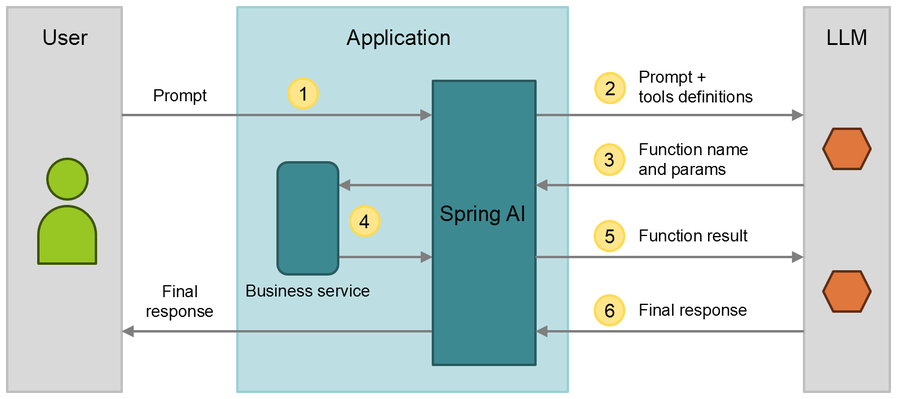
The steps are:
- The user prompt is send to the backend and passed to the
ChatClientinstance. - Spring AI sends the prompt to the LLM along with the definition of all the tools.
- The LLM decides that executing a given tool is needed to answer the prompt and returns a message saying so.
- Spring AI interprets the LLM response, finds the corresponding method in the business service and calls it with the provided parameters.
- The result of the method call is sent back to the LLM in a new prompt.
- The LLM provides the final response to the user prompt.
Complex user prompts may trigger multiple function calls and so multiple LLM calls.
If you want to see the detailed logs of the various messages exchanged with the LLM,
SimpleLoggerAdvisor won't help. It is too high level. Instead, you can enable the logging of
the HTTP calls performed by the RestClient used for Ollama or OpenRouter (other LLM providers may use
a different HTTP client library).
Here is a curated and simplified log extract showing the HTTP calls for the prompt about Paris weather.
The first HTTP request contains the conversation content and the tools definitions:
// POST http://localhost:11434/api/chat
{
	"messages": [
		{
			"role": "system",
			"content": "You are a polite, friendly and helpful assistant."
		},
		{
			"role": "user",
			"content": "What's the weather in Paris ?"
		}
	],
	"tools": [
		{
			"type": "function",
			"function": {
				"name": "getCurrentWeather",
				"description": "Return the current weather report for a given city including the condition and temperature in celsius.",
				"parameters": {
					"properties": {
						"city": {
							"type": "string",
							"description": "The name of the city"
						}
					},
					"required": [ "city" ]
				}
			}
		}
	]
}
The HTTP response shows the LLM asking for a function call to getCurrentWeather with city parameter set to Paris:
{
	"message": {
		"role": "assistant",
		"content": "",
		"tool_calls": [
			{
				"function": {
					"index": 0,
					"name": "getCurrentWeather",
					"arguments": {
						"city": "Paris"
					}
				}
			}
		]
	}
}
After Spring AI called the getCurrentWeather method of the WeatherService business service,
the second HTTP request is sent to the LLM, including the conversation content, the tool response and once again the
tools definitions:
// POST http://localhost:11434/api/chat
{
	"messages": [
		{
			"role": "system",
			"content": "You are a polite, friendly and helpful assistant."
		},
		{
			"role": "user",
			"content": "What's the weather in Paris ?"
		},
		{
			"role": "assistant",
			"content": "",
			"tool_calls": [
				{
					"function": {
						"name": "getCurrentWeather",
						"arguments": {
							"city": "Paris"
						}
					}
				}
			]
		},
		{
			"role": "tool",
			"content": "{\"condition\":\"STORMY\",\"temperatureInCelsius\":10.0}"
		}
	],
	"tools": [
	    ...
	]
}
Then the LLM can return the final response:
{
	"message": {
		"role": "assistant",
		"content": " It looks like it's stormy and 10 degrees Celsius in Paris today! Make sure to bring an umbrela if you plan on going outside. Enjoy your stay!"
	}
}
Conclusion
In this article, we saw how to implement with Spring AI a simple chatbot that supports conversations. A simple web UI was implemented to interact with the chatbot. We also saw how to add function calling capabilities to the chatbot, allowing it to use methods from business services. This makes the chatbot much more useful as it can leverage the specific logic and data of the application.
I hope you enjoyed this article. Feel free to check the sample application in GitHub and experiment with it.